Tuesday, May 26, 2015

Renderings from Particular Perspectives

The following are some of the renderings I included to show particular perspectives within the bridge. Entourage were included in the final presentation. 

ABOVE: URBAN AGRI CENTER

ABOVE: DOCK/BOAT LAUNCH

ABOVE: OUTDOOR THEATER TOP LEVEL

ABOVE: EDUCATIONAL CENTER SECOND FLOOR

ABOVE: CAFE WITH SOLAR SCREEN ABOVE

Image of my Presentation Final


Below are some of the images I included in my site identity. The colored site analysis shows the location of the building programs as well as their relevance to the river, nearby bridges, and two cities.


Below are some renderings I created to give a better sense of the bridge. 


TOP PLAN ABOVE

BOTTOM PLAN ABOVE


EAST SECTION VIEW

WEST SECTION VIEW (actual landscape in background)

View down the pathway from one side of bridge on first level. Here you can see the graffiti wall, the ramp that leads through a large overlook opening, and the waterfall in the center, as well as the scenery of the city in the distance.

Actual Bridge Design

My idea of my bridge was to stay simple and focus on geometric shapes.
This was a suggestion for my last project, and I felt it fit well with this project.

One of the goals of this competition was to link the two communities across the river, and what better way than to communicate with a common geometric shape and the basic languages of music, art, and nature. Everyone, regardless of their background, can assimilate into this community and appreciate the beauty within. The design is meant to stay simple in order to focus on the surrounding programs I developed as an architect, and the programs and beauty reinforced and created by the users as well.

I also wanted to focus on making it easily accessible for everyone regardless of their physical abilities. There is a ramp that connects the two levels, both of which are rectangular. The winding paths connect to a widened grass level that connects back to the land on either side of the river. Simultaneous arches hold the second level up, as well as similar arches which act as the entire bridge supports. In the center, where the ramps meet and give access to the second level, holds a large waterfall and fountain. The water falls on either side of the ramp down to the large pool below, which sits right at the center of the first level.

The first level focuses on the arts and learning. The mirrored windowed buildings submerged in the bridge (education center and cafe) are located on opposite ends, and the other buildings are symmetric to each other. Walking paths walk right down the center and surround the pool. They offer a path to a plaza on either side of the pool. One plaza has tropical plant life, the "Tropical Plaza" while the other has deciduous and coniferous plants, the "Forest Plaza".

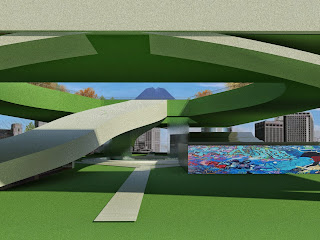
The second level only has the outdoor theater and the playground, reinforcing more laidback play and enjoyment. This focuses mainly on the ability to enjoy the surroundings and enjoy the view of the city from the top of the bridge.

The entire bridge is lined with railings and the materials reinforce the natural life of the bridge. Brick, cobblestone, marble, cement, plenty of grass space and the occasional turf for the playground. There is also plenty of water that mirrors the water below the bridge.

Catching Up

These past few weeks have been hard to keep track of.

In review of the progress I made:

  1. I have designed and created each of the desired buildings, which include an Urban Agriculture Center, Outdoor Theater, Cafe, Dock/Boat Launch, Educational Center, and Playground.
    1. The Urban Agriculture Center is a building that is built of multiple levels. The levels decrease in width as they increase in height, but the roofs of the below layers are then green spaces that are filled with natural life for people to walk around and enjoy the nature. There is also an opportunity to experience agriculture within the building as there are more plantlife to learn from and enjoy. The upper roof has a nice view of the river and city with a fountain in the center. Beside the Center is an interactive center where people can create their own plant and hang from a line in order to add to the beauty of the facility. Wind powered towers are located nearby.
    2. The Outdoor Theater is a simpler place, that encourages more lax performances. There is a green sloped upper level that overlooks all of the seats below, and the stage is surrounded by a somewhat transparent overhang canopy, but in the light, spectators are still able to see beyond the stage. At night, with the lights above, the focus would be on the performers onstage.
    3. The Cafe is also very open, with no real roof. The cafe is meant to have a regular food station, a vegetarian station and a vegan station. The bathrooms are located in this building as well. There is a covered stairwell that leads down to the dock below the bridge. The cafe is somewhat submerged in the bridge, and has a large curving window that allows a beautiful view for all the patrons within the eating establishment. Above the cafe is the solar screen I developed in Grasshopper, translated over to a beautiful solar screen above the space.
    4. The Dock is a large space enclosed in brick windowed walls, allowing for different size boats and canoes to dock for a brief period of time. The stairwell leads directly to the cafe above.
    5. The Educational Center focused on music and performance. The design is literally similarly shaped to a piano, and mirrors the cafe in its submergence in the bridge. It has the same curving window that permits a great view from the first level. The second level is more individual performance based with an acting room and a piano/musical room, both catered with their materials (padding/sound proof).
    6. The playground includes both your expected pieces and some random shapes located in spaces that allow creativity with use. It is similar to the design of the playground in the winning design of the competition.
  2. I also included my indoor theater from Assignment 3, in order to promote the arts more in a more specific way. In order to translate to the space, I made the outer walls graffiti/artistic walls, where passersby could share their artistic expression and add to the beauty of the space.
  3. Throughout the bridge, all the walls are green walls or art walls, and the empty spaces are filled with plantlife, art pieces, or sitting centers around fountains or sculptures.

Friday, May 15, 2015

Thoughts on the Final Project


  1. I am unfamiliar with what an Urban Agriculture Center is, but upon research I have gathered it a building that promotes green design and agriculture in general. I have developed a building that allows for vertical farming and for people to walk through and grasp a better idea of urbanized agriculture. They can learn through interaction how to be a part of sustainability, and they can even contribute and build their own plant to contribute to the attraction.
  2. I want to make the place accessible for disabled patrons, and thus I think I will made a gradual ramp as opposed to a set of stairs to maneuver the pathway. This will extend the trip, but the design can work with this. 

For designing this project, I am using Rhino to develop the landscape and bridge. I am using Revit to construct the individual buildings, and making some of them similar in design. While the attraction of the bridge is its multiple programs, the individual architecture should promote the focus on the landscape and the goal of Green Urban Design. 

I will use Photoshop to create a more understanding environment to get my thoughts across.

Final Project

This final project involves a lot of creativity and time.

For the Bridge project, my ideas involve creating a two level bridge.

  • The first level will be the interactive section, which will have a huge focus on urban agriculture and environmentally friendly development.
  • My Urban Agriculture Center, an Educational Center, and a Vegan Cafe will all be located on the first level. Some of these structure will be placed within the bridge, at a lower level. 
    • This forms different levels on one level, and will bring people closer to the water. I will provide a vantage viewing point of the river below, and make visitors appreciate the beauty.
  • I will create a second tier that holds the theater and playground. 
    • The theater on the second level will be an outdoor amphitheater that is surrounded in green landscape, furthering the promotion of a green design.
  • I will place my theater from Assignment 2 on the first tier to also incorporate entertainment, yet it will still have this advantage of a beautiful viewing spot from the front room, overlooking the river.
  • All blank walls will either be transformed into green walls OR into walls that embrace graffiti. Vandalism won't be encouraged, yet we will promote independent creativity and artistic tendencies. They will either be chalkboard walls or walls that will provide as a canvas for both professional and beginner artists alike. 
  • Waterfalls will be placed beneath the pathway that brings visitors up to the second level.
    • A long path that can be used for walking or bicycle use will take visitors from one side of the river to the other, winding through the buildings and attractions around the bridge.
  • Cars will not be permitted on the bridge.
  • A dock will be accessed from one of the buildings located within the bridge, likely the cafe. 

Exploration of Theater Materials

This image shows the theater exploded as to provide an idea of the materials used and where they are included. The following materials are included:

  • Linoleum Front Entrance

  • Carpeted Floors on Levels

  • Carpeted Stairs

  • Wooden Floor around Stage

  • Carpeted Walls

  • Wooden Center Wall

  • Masonry and Steel Walls

  • Steel Louvers

  • Glass Window

  • Acoustic Ceiling Tile
  • Diagrams of the Theater

    Below are my sound and acoustic diagrams, respectively. I organized the seats as to allow all patrons an optimal visual experience as well as acoustic. The acoustic diagram also shows how the reverberation would work in the event of a theatrical performance.


    This image shows the two overlaid, showing how the two senses interact and optimize full use of the stage space.
    I also included individual sight diagrams from three different tiers of seats. The front row is closer than the back row, yet all seats have a great vantage point. The front row is the most expensive as their experience is much more impressive, yet the cost is still not too expensive. Ideally the theater would host large events that attract a good amount of people, but because of it's small size and lack of Broadway-esque quality, the patrons would not spend too much on their seats.
    Sixth row at $45

    Fourth row at $55

    Front row at $75


    Designs in Place

    Below is a plan of my design. Some changes will have to be made. For instance, on the floor through which the patrons enter to get to their seats, I placed a fabric wall that prevents their access. This will be removed, though around the other walls these will remain as to prevent reverberation.

    Additionally, I need to add in access points, such as stairs from the stage to the theater seats area. I need to consider changing spaces in the space below, and I need to consider how the door placement will affect both light entering and acoustic movement.

    Below is a section cut that show the numerous layers. 
    Below is a rendered image of the section cut above. Notice the louvers that surround the upper space, as they are currently in an open position.


    Beginnings of a Design

    Design

    For my Assignment 3 theater, I have begun to layout how the stage and seats are arranged. The materials have begun to be put in place.

    My ideas have all come to fruition. I am developing spaces both above and below the stage.

    As for below the stage, I gave a great deal of space for both the actors to move around, change and practice and relax, as well as space for the crew to move around props, boost up to stage either through pushing up the side ramps, or lifting from below the stage.

    As for above the stage, I created a circular region around the stage. The crew has visibility through the louvers that will create the separation between the audience and the crew on the floor above. Also, the louvers will allow for the crew to hear the actors below to listen for cues.

    Problems

    Luckily my only problems have been getting used to the program. My hardest challenge was figuring out how to produce the louvers. Eventually, through the use of a tutorial, I have learned how to use families and parameters to create a system of louvers. These louvers will surround the upper space that allow a space of movement for the crew.

    I had an issue with building the ramp, as well. Ramps on Revit are tricky to use, and ultimately I settled on a less intricate shape. Initially I wanted a gradual slope that coincides with the circular shape of the stage. This would then descend beneath the rows of seats throughout the audience.

    Research for Assignment 3

    Upon researching what helps a round theater produce the most impressive acoustics, and what encourages strong sightlines:


    • You want to minimize reverberation in musical performances. 
      • Organizing the audience around the performer in a way that they are all within acoustic lines will allow for the best sound to all patrons.
    • You want to maximize reverberation in theatrical performances to help the actors with their vocal pronunciation and projection.

    My ideas to utilize this information is to create a system of louvers similar to the way I did in my previous assignment. These louvers will be made of a reverberate metal material, and when closed they will provide optimal acoustics for theatrical performances. On the contrary, when they are opened, sound will pass to the back walls of the theater and be absorbed by the absorbent materials, likely a carpeted or fabric material.

    As for materials throughout the rest of the building, I want to minimize the amount of reverberation that will happen anywhere else. The floors and walls will absorb the sound, and will be covered with a fabric or carpet material.

    The stage floor will be an absorbent wooden material. 

    The ceiling will be made of acoustic ceiling tiles.

    In addition, the front entrance prior to entering the stage area will be covered in absorbent materials, in case the sound escapes through the doors. The tiles will be of an absorbent material, and the furniture will all be wooden and fabric. The only additional material will be a decorative large front window made of glass, though this will not provide a great deal of reverberation upon research.

    Research has also shown that you want total control of lighting, and my idea is to only allow indoor lighting in the stage area. This will be controlled by a crew who can move around above the stage or below the stage. The only other external light will enter through the entrance, prior to the stage area.

    Assignment 3

    Using Revit for an assignment is very exciting! This is a program I am only slightly familiar with through a few lessons in high school, so I am eager to learn more. 

    The third assignment involves using Revit to create a theater. 

    The following are my initial ideas for my theater.
    • Indoor theater
      • Ideally a round theater
      • Round theaters are more intimate and easy to interact with the audience.
      • Small yet can seat many people, and most seats have a pretty good view.
    • Located again in an urban setting yet near the water ideally.
      • Strong proponent of recognizing urban centers near bays, oceans, etc.
    • Small building

    Final Presentation of Assignment 2


    Assignment 2: Development Problems

    Developing the actual screen hasn't been that difficult, tutorials have been a huge help in determining the order of the commands, and how things relate.
    What I have struggled with is how the remainder of the building will interact with the screen and window. My abstract geometry is difficult to build off of. While I could rebuild the entire structure, due to time constraints, I have been attempting to build the remainder of the building based on the existing window and screen.

    I am imagining a space that can have multiple purposes, theoretically a performance or entertainment space, and located near an urban yet seaside region. The Baltimore Inner Harbor is a great example. A region of business and entertainment, yet not right in the middle of the city. Exposure to sun is also highly valued. The program within the building can manipulate the amount of lighting that enters within. For instance, an exhibit can allow all of the sun to enter, but a theater presentation or a performance may only want to utilize indoor lighting and shut the screen entirely.

    Below is an image of what my building has come to look like. The only real source of outdoor lighting is through the window with the screen atop of it.


    Assignment 2 in Phases

    Part of the Assignment is to focus on the Process you went through to come to your final product. I have been recording what the process looks like throughout the development.
    Phase 1: I drew a series of curves (through offset and resizing) and lofted them together in Grasshopper.

    Phase 2: I divided into subsurfaces, and then using a number slider, selected the numbers at random for the U and V coordinates.

    Phase 3: I deconstructed the brep or surface (DeBrep) into parts.

    Phase 4: I specified the locations of the points on the surface using a number slider. Using points on the surface, I created planes and then normalized them so that they are all perpendicular to the z-axis which is determined by those points.

    Phase 5: I also created a point to help define the height of those placed based on the point's location. I then extruded each of the curves along the surface with respect to the direction from the point.

    Phase 6: I created a curve and broke it into points. The points on the curve interact with the points on the surface and will determine the angle of the rotation of each plane.

    Phase 7: Through a combination of all of the above information (including location and direction of plane, height of extrusion, and angle) I created the planes the can rotate through manipulation of any of these elements. Theoretically, the movement of the sun would be the manipulation.

    Phase 8: I extruded each of the planes to turn them into physical panels.

    Phase 9: I offset the original plane and extruded it to create a glass window in the same shape beneath the louvers. The louvers create a penetrable screen over an impenetrable window. 

    Grasshopper Process

    Grasshopper is very oriented to coding, something I am highly unfamiliar with.
    For the second assignment, I've been watching lots of tutorials.

    Something I have had a huge interest in are Louvers, and this video was a very helpful guide on how to develop louvers in Grasshopper.

    My idea for my design is to develop a technologically advanced screen that interacts with the sun's rotation. Another project I'm currently working on manipulates the sun through use of PV panels. I have been considering incorporating these into louvers in my screen for the second assignment.

    My idea is to ultimately create a screen of louvers that are covered in PV panels, and they can rotate along with the Earth's rotation around the sun. As the sun moves throughout the day, these panels will rotate to follow its motion and absorb as much energy as possible.

    The shape of the screen will likely be somewhat rounded/spherical to maximize the location of the louvers. By placing these louvers in a spherical shape, it optimizes how likely they are to be in a location of maximum solar absorption.